
To winterize your pool plumbing, turn off the pump and filtration system, then attach an air compressor or shop vac to the lines to blow out the water. Gradually increase the pressure until water bubbles out of the skimmer and return lines, signaling they’re clear. Quickly plug the openings with suitable pool plugs to prevent water re-entry. Following these steps helps shield your system from freezing damage and sets the stage for a smooth winterizing process. Keep going to discover detailed tips and precautions.
Key Takeaways
- Turn off the pump and filtration system, then attach an air compressor or shop vac to the plumbing lines.
- Gradually increase pressure while observing water bubbling from returns or skimmers to blow out water safely.
- Use controlled, steady pressure to clear all water from each line without causing pipe damage.
- Immediately plug skimmer and return openings with properly fitting pool plugs after blowing out the lines.
- Double-check that all lines are fully sealed and free of water before covering the pool for winter.

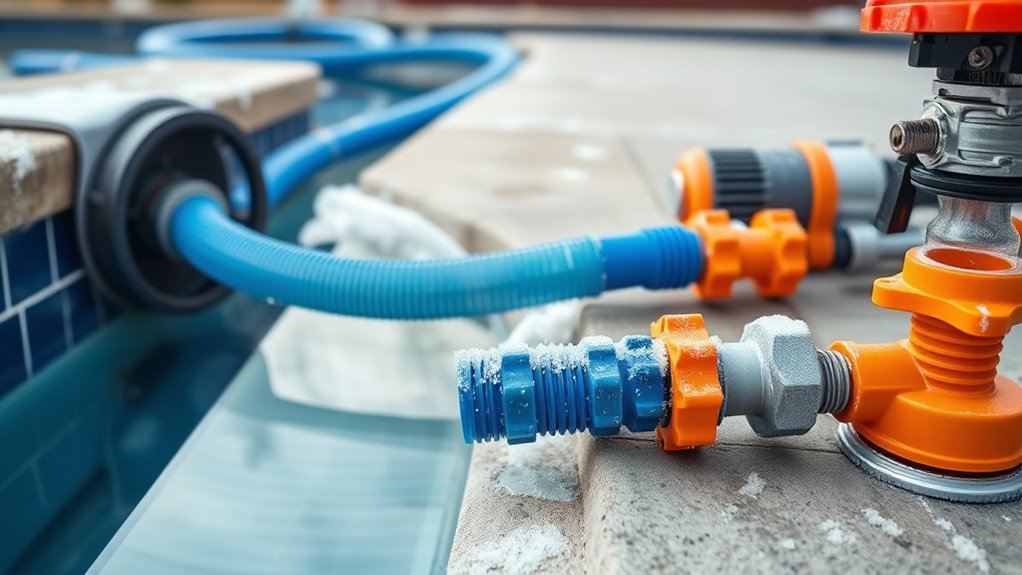
As winter approaches, it is vital to properly winterize your pool plumbing to prevent damage from freezing temperatures. One of the most important steps in this process is blowing out the lines and plugging the returns. This helps to eliminate any remaining water that could expand and cause cracks or burst pipes when temperatures drop below freezing. Before starting, verify your pool’s chemical balance is in check; a proper chemical balance during seasonal maintenance not only maintains water clarity but also helps prevent corrosion and buildup that could interfere with the winterizing process.
Begin by turning off your pool’s pump and filtration system. Remove any accessories like skimmer baskets, ladders, and return fittings that can be stored indoors for the winter. Next, attach an air compressor or a shop vac to the pool’s plumbing lines—specifically to the skimmer and return lines. Gradually increase the pressure to blow out the water from each line. You’ll notice water bubbling out of the corresponding return or skimmer openings as the air pushes out the water trapped inside. It’s essential to do this slowly to avoid damaging the pipes with sudden pressure changes.
Turn off your pump, remove accessories, and carefully blow out each line with an air compressor.
As you blow out each line, plug the openings immediately afterward to prevent water from re-entering. Use specially designed pool plugs that fit snugly into the skimmer and return ports. These plugs are vital for sealing off the system and ensuring no water remains in the lines. Keep in mind, this process is part of your seasonal maintenance routine, aimed at protecting your plumbing from winter’s harsh effects. Properly blown out lines reduce the risk of freezing and cracking, saving you money and hassle come spring.
Once all lines are cleared and plugged, double-check each connection to make sure no water remains. Confirm that your pool’s chemical levels are balanced, as this can help prevent corrosion during the off-season. Cover the pool with a winter cover to keep debris out and maintain a clean, protected environment for your pool’s equipment. Remember, neglecting to blow out the lines or properly plug the returns can lead to costly repairs down the line. Taking the time during this seasonal maintenance step ensures your pool plumbing stays intact and ready for easy startup in the warmer months.
Additionally, using quality pool plumbing components during the winterizing process can make re-opening your pool much simpler in the spring and help avoid potential damage.
Frequently Asked Questions
When Is the Best Time to Start Winterizing Pool Plumbing?
You should start winterizing your pool plumbing when weather factors and timing considerations align, typically before temperatures consistently drop below freezing. Keep an eye on local forecasts; it’s best to blow out lines and plug returns a week or two before the first expected hard freeze. Acting early helps prevent pipe damage, ensuring your pool is protected throughout the winter months. Don’t wait until the cold snap hits to begin this essential process.
Can I Winterize My Pool Plumbing Myself or Should I Hire a Professional?
You can definitely winterize your pool plumbing yourself, but it’s not a decision to take lightly—it’s as vital as a heart surgeon’s work! For DIY safety, follow detailed instructions carefully and use proper equipment. However, if you’re unsure or want peace of mind, hiring professional services guarantees the job’s done right without risking costly damage. Weigh your skills and comfort level before deciding—your pool’s health depends on it!
What Tools Are Necessary for Blowing Out Pool Lines?
You’ll need an air compressor to blow out your pool lines effectively. Make sure it has enough pressure, typically around 50-80 PSI. You’ll also need pool plugs to seal the lines once the air is blown through, preventing water from re-entering. Use the compressor to force air through the skimmer, returns, and main drain, then quickly plug each opening with a pool plug to keep the lines clear during winter.
How Do I Identify if a Line Is Properly Blown Out?
Imagine water flow stopping completely when you blow out your lines—no more trickling or drips, just a steady stream of air. To verify if a line’s properly blown out, listen for a hissing sound and confirm air pressure remains steady without leaks. When water is fully expelled, and airflow is consistent, you know the line is clear. Keep an eye on your gauges and listen carefully; that’s your best indicator.
Are There Different Procedures for Inground vs. Above-Ground Pools?
Yes, there are different procedures for inground and above-ground pools. Inground pools often require more extensive plumbing blowouts and specific plug placements, while above-ground pools usually need simpler steps like drain plugs and cover selection. During winterizing, guarantee you’ve balanced chemicals properly and chosen the right pool cover to protect your pool. Follow the appropriate procedure for your pool type to prevent damage and keep it in good condition for spring.
Conclusion
As you seal up your pool for winter, think of your plumbing as a sleeping giant, resting peacefully through the cold months. Blowing out the lines and plugging the returns is like tucking it in with a warm blanket, protecting it from the harsh winter’s breath. When spring awakens, your pool will be ready to spring back to life, clear and inviting. With these steps, you’re ensuring your backyard oasis stays safe, sound, and ready for splash-filled days ahead.