TL;DR
Placing your rig in a closet can drastically reduce noise, but it requires proper placement, ventilation, and tailored treatment. Foam alone won’t block sound; sealing leaks and managing heat are key to success.
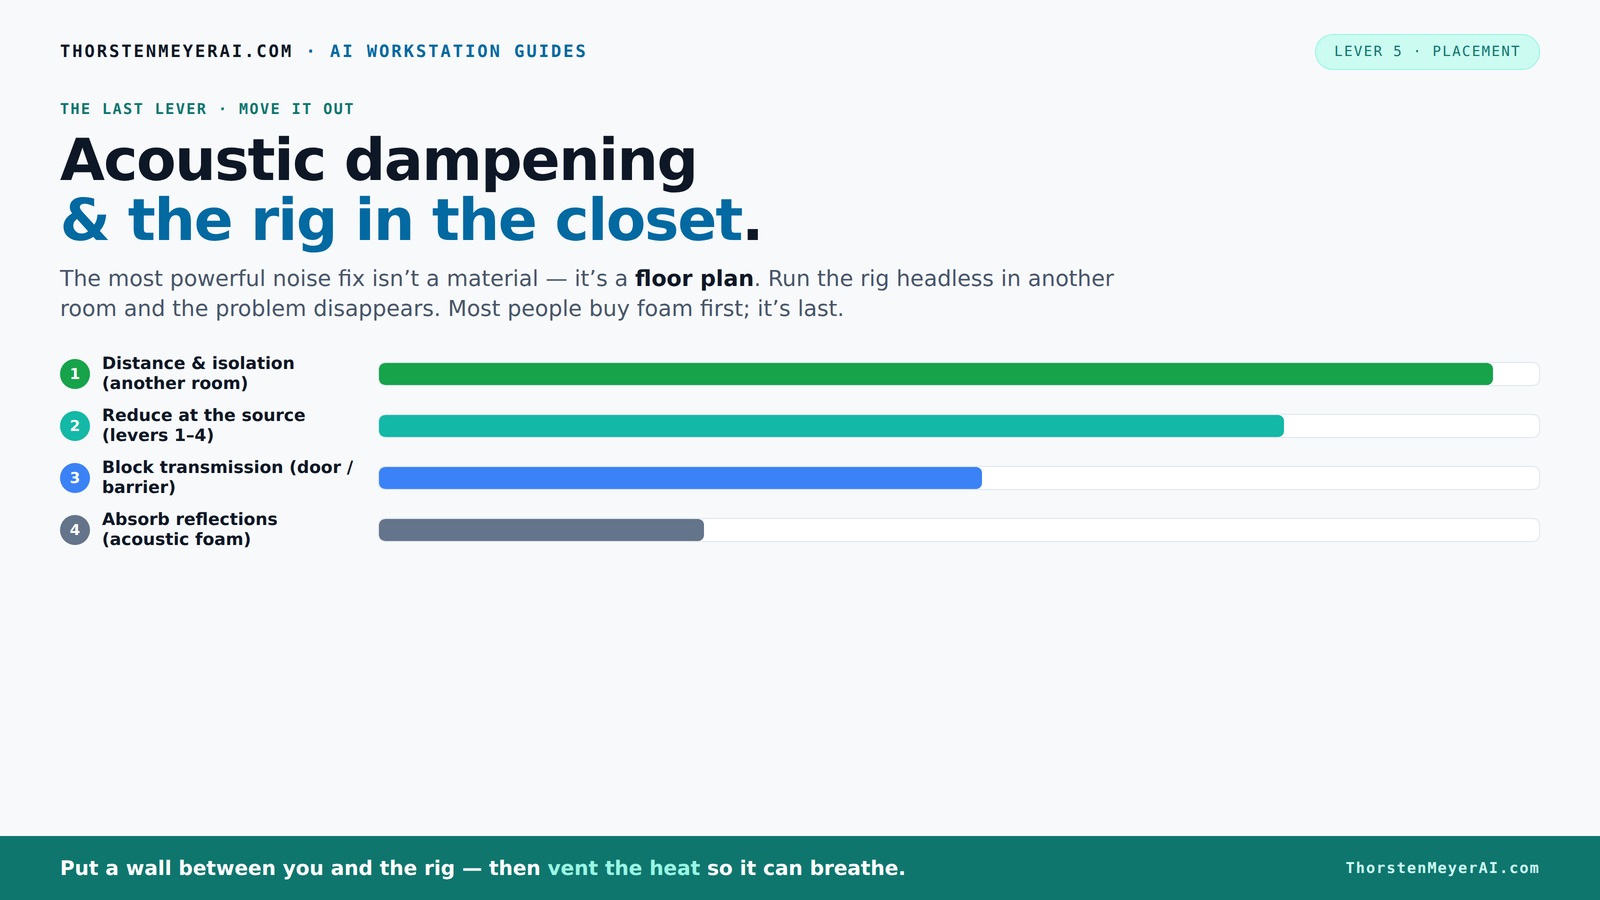
Acoustic dampening
& the rig in the closet.
The most powerful noise fix isn’t a material — it’s a floor plan. A rig you can’t hear because it’s in another room beats any amount of foam. Tap the approaches in Part 1 to see what actually works.
(another room)
(levers 1–4)
(door / barrier)
(acoustic foam)
Contain the noise, not the heat
Key Takeaways
- Placing your rig in another room is the most effective way to reduce noise without treatment.
- Ventilation is critical when putting a high-power machine in a closet to prevent overheating.
- Sealing gaps around doors and outlets makes a big difference in controlling sound leaks.
- Acoustic treatment inside the closet reduces echo but doesn’t block sound from escaping.
- Bass traps and low-frequency treatment are essential in small spaces for cleaner recordings.

Focusound 52 Pack Acoustic Foam Panels 1" x 12" x 12" Sound Proof Foam Panles Soundproofing Noise Cancelling Wedge Panels for Home Office Recoding Studio with 300PCS Double-Side Adhesive
Soundproofing - Acoustic foam panels triangular grooves structure for better noise absorption, helps to reduce and absorb unwanted...
As an affiliate, we earn on qualifying purchases.
As an affiliate, we earn on qualifying purchases.
Why Placement Is Your First and Best Noise Solution
Placing your rig in another room or behind a wall beats all other noise tricks. Think of it like turning off the TV — the sound simply disappears. For home studios, especially with AI workstations that you access over the network, the rig doesn’t even need to be next to you. Just a wired or strong Wi-Fi connection and good ventilation. For example, I moved my GPU rig into a closet in the basement. It roars there, but I sit upstairs and hear almost nothing. Placement is the simplest, most effective fix because it reduces noise at the source.
Plus, it saves you money on soundproofing materials. You can focus your treatment on what’s left — reflections and leaks — rather than trying to block all sound. Remember, the less noise reaches your ears, the less you need to fight echoes or work on expensive soundproofing.

Portable Recording Booth for Home Studio, Foldable Sound Isolation Vocal Shield with Floor Stand, High-Density Acoustic Blanket Enclosure for Singing, Voiceover & Podcast, Includes Phone Holder
INSTANT STUDIO-QUALITY "DRY" SOUND: Transform any noisy room into a professional vocal booth instantly. Engineered with high-density acoustic...
As an affiliate, we earn on qualifying purchases.
As an affiliate, we earn on qualifying purchases.
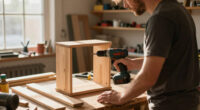
The 'Rig in the Closet' Setup — How to Do It Right and Avoid Cooking Your Gear
Putting your workstation in a closet is a smart move, but only if you handle heat properly. Sealing a space completely traps hot air, turning your closet into a sauna for your hardware. A GPU that consumes 600W of power will heat up a small, sealed closet rapidly. Temperatures can climb from 70°F to over 100°F in just an hour, risking thermal shutdown or damage.
To prevent this, install active ventilation — a quiet exhaust fan or even a small duct system. You want hot air to escape and cool air to enter, keeping your rig at a safe, stable temperature. For example, I used a small, quiet fan hooked up to a thermostat in my closet. It keeps the temperature below 85°F even during intense workloads. Built-in soundproof cabinets with ducted airflow are worth the investment if you want both quiet and cool operation. Learn more about cooling options in this acoustic dampening, placement, and the 'rig in the closet' setup.

GRIFFIN 3U Rackmount Cooling Fan System (UltraQuiet X Edition) – Triple Exhaust Fans, Keep Studio Audio Equipment Gear Cool – Network IT Server Rails – DJ PA AMP Temperature Control Panel Cabinet
DISCOVER THE MOST RELIABLE NETWORK RACK FAN COOLING SYSTEM: When it comes to your professional equipments performance and...
As an affiliate, we earn on qualifying purchases.
As an affiliate, we earn on qualifying purchases.
Soundproofing Inside the Closet: Absorption, Sealing, and Blocking Leaks
Acoustic dampening inside the closet helps tame echoes and reflections, but it won’t block sound leaks. Think of absorption as softening a room’s echo — adding foam panels or blankets reduces reverb. But sound still escapes through gaps, doors, and weak points. To truly quiet your setup, you need to seal these leaks and add mass.
For example, weatherstripping around the door, sealing outlets with foam gaskets, and adding a dense, sealed door make a difference. Thick drywall layers or damping compound increase the mass, helping block low-frequency noise. A simple DIY trick? Place a moving blanket over the door when recording vocals — it’s cheap and effective. Remember, absorption reduces inside reflections, but sealing leaks is what keeps noise from leaking out.

Weather Stripping Door Seal Strip - Soundproof Q-Shaped Foam for Exterior Door Frame, Large Gap Seal, Noise Cancelling, Easy to Install (Black, 26FT)
No light penetration: Our door seals are made of high-density foam core material, which effectively blocks light from...
As an affiliate, we earn on qualifying purchases.
As an affiliate, we earn on qualifying purchases.
Where to Place Acoustic Panels for Maximum Effect in a Closet
Placement of panels is key. Start by treating the reflection points: the side walls and ceiling behind your mic should get the first panels. For example, if you’re recording vocals, position panels at the point where your voice bounces back to the mic. Use a mirror trick — place a mirror on the wall and see where your reflection appears from your recording position. That’s where the panels should go. For more tips, see this guide on acoustic treatment placement.
Next, add bass traps in the corners to control low frequencies and standing waves. Thicker panels work better for bass, but space is often limited. If your closet is tiny, thinner panels are easier to fit but may need to be supplemented with bass traps. For example, I installed thick foam strips behind my mic and along the ceiling, which cut down echo significantly. A comparison of panel types and placement is shown in this
Doors, Gaps, and Outlets: Seal Every Weak Point
Sound leaks through gaps, outlets, and imperfect seals. That tiny crack around your door or outlet can let in or out a surprising amount of noise. The fix? Use foam weatherstripping around the door, foam gaskets on electrical outlets, and seal all seams. For example, I covered my closet door’s edges with foam tape, and it made a noticeable difference. Outlets can be sealed with outlet gaskets or even foam plugs. For more sealing tips, check out this guide on acoustic dampening and sealing.
These small steps create a tight shell that keeps noise inside or out. Without sealing, even the best panels won’t help much because sound will find its way through weak points.
Floor and Surface Treatment — Making Reflection Control Easier
Adding rugs, carpets, or moving blankets on the floor and surfaces can drastically reduce reflections and echo. Think of it like walking on a soft, plush carpet instead of a hard tile. For example, a thick rug in front of my microphone cut down the bouncing sound, making recordings warmer and cleaner.
This is a low-cost way to improve sound quality without permanent modifications. It also helps with reducing footstep noise and rustling sounds that might leak through the door or gaps.
Bass Traps and Low-Frequency Control — When to Add More
Small spaces, like closets, often have trouble with low-frequency buildup — the boominess that muddies recordings. Bass traps or thicker panels help absorb these deep sounds. For example, placing bass traps in the corners of your closet can reduce standing waves and improve clarity.
If your recordings sound boomy or if you notice uneven bass, investing in bass traps is worth it. Thicker, denser panels are best for this purpose, especially in tight spaces where low-end resonances are common.
Limitations: What a Closet Setup Can’t Do for You
Closets are great for reducing echoes and some noise, but they’re not soundproof chambers. Footsteps, rustling clothes, or loud neighbors will still be heard if you don’t address structural leaks. Foam panels don’t block sound from passing through walls or doors. They only reduce reflections inside.
For true soundproofing, you need heavy, sealed walls or specialized construction. Think of your closet as a semi-treated room — enough for cleaner recordings but not for complete isolation from external noise.
Budget, Semi-Permanent, or Built-In? Choosing Your Closet Treatment Approach
Depending on your budget and permanence needs, you can go from DIY solutions to professional enclosures. For quick fixes, blankets, rugs, and reflection filters work well. For a long-term setup, consider building a custom sealed booth or installing dedicated soundproof panels with ducted ventilation. Each approach has tradeoffs.
For example, I started with blankets and moved to a custom cabinet with fans and insulation. It’s about balancing cost, effort, and how much noise you want to block or absorb. See this case airflow and soundproofing guide for more ideas.